Introduction
This document provides a comprehensive overview of the core scripts and graphics included. This asset offers everything you need to create a 2D vehicle game, including scripts, graphics, and setup instructions.
This guide is designed to help you understand the asset’s functionality and how to integrate it into your projects. Whether you’re a beginner or an experienced developer, this guide will provide valuable insights and guidance.
By following the steps outlined in this guide, you can quickly set up and customize your own 2D vehicle game. We hope that this asset will spark your creativity and help you bring your racing or other vehicle-related game ideas to life.
Let’s dive into it!
Requirements
- Unity 2022.3 LTS or Unity 6. Unity 6 is fully supported without warnings or API Updater changes.
- TextMesh Pro for the demo UI. Import the TMP Essential Resources when Unity asks.
Optional packages. The asset compiles and runs without them, and picks them up automatically when they are installed:
| Package | What it adds |
|---|---|
| Cinemachine 2.x or 3.x | The camera that follows the vehicle and zooms out with speed (AttachCamera). |
| Input System | Gamepad and tilt (accelerometer) controls, rebindable controls, and keyboard input when the old Input Manager is turned off. |
| Universal Render Pipeline (2D Renderer) | Headlights and nitro glow that fade in and out (VehicleLights with URP 2D lights). |
Setup
Step 1: Import the tags, layers and sorting layers stored in the preset file
Assets/Cubehole/VehicleController2D/Preset/VehicleController2d (Project Settings > Tags and Layers > preset icon).
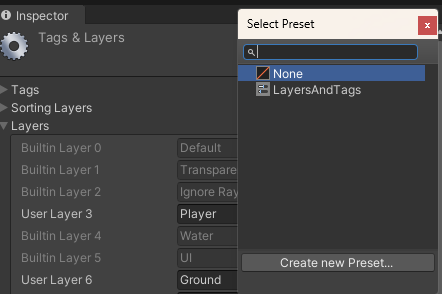
Step 2: Open the demo scene located here
Assets/Cubehole/VehicleController2D/Scenes/Demo.unity
Step 3: The vehicle data assets in Assets/Cubehole/VehicleController2D/Data treat the Default layer as ground. If your ground uses another layer, set it in Ground Mask on each vehicle data asset.
Step 4: Play the scene and enjoy!
Vehicles never collide with their own parts (body, wheels and driver). This is handled in code, so you don’t need any special collision matrix settings.
Controls
All input sources work at the same time. When more than one is used at once, on-screen buttons win over the keyboard, the keyboard over a gamepad, and a gamepad over tilt.
| Action | Keyboard | Gamepad (Input System) |
|---|---|---|
| Accelerate / brake and reverse | Right / Left arrow, D / A | Right / Left trigger, left stick, D-pad left and right |
| Lean forward / back (bikes) | Up / Down arrow, W / S | Left stick or D-pad up and down |
| Handbrake | Space | South button (A on Xbox, Cross on PlayStation) |
| Nitro | Left Shift | East button (B, Circle) or right shoulder |
Triggers, sticks and tilt are analog: half a trigger drives at half throttle, and a half-tilted stick leans the rider part of the way.
On-screen buttons
The demo canvas has touch buttons for mobile. Each one has a ButtonHandler component with its button type (Throttle, Brake, HandBrake, Nitro, Forward, Backward).
Tilt (phones and tablets)
Tilt needs the Input System and a device with an accelerometer. On VehicleInput:
- Use Tilt turns it on (it’s off by default, and the sensor is only switched on while it’s used).
- Tilt Control: Lean shifts the rider’s weight, like the lean buttons. Throttle drives: tilt right to accelerate, left to brake and reverse.
- Tilt Dead Zone (default 3°) is ignored around level. Tilt Max Angle (default 25°) gives full input.
Input System and Rebinding
Active Input Handling
Edit > Project Settings > Player > Other Settings > Active Input Handling sets which input backend Unity uses:
- Input Manager (Old): keyboard and on-screen buttons. Gamepad and tilt need the Input System.
- Input System Package (New), the Unity 6 default: keyboard, gamepad, tilt and on-screen buttons. Install the Input System package from the Package Manager.
- Both: everything.
With only the Input System enabled, the old UI input module throws errors every frame. VehicleInput replaces any StandaloneInputModule with the Input System’s UI module at runtime, including in scenes you load later, so the on-screen buttons keep working. You can also replace it in your scenes yourself.
Rebinding the controls
VehicleInput has four optional fields under Rebinding: Move Action, Lean Action, Hand Brake Action and Nitro Action. Each field you assign replaces the built-in keyboard and gamepad controls for that action; empty fields keep the built-in ones.
- Create an Input Actions asset (Create > Input Actions).
- Add the actions: Move and Lean as Value / Axis actions (for example with a “1D Axis” composite: negative is brake or lean back, positive is accelerate or lean forward), and Hand Brake and Nitro as Button actions.
- Drag the actions into the fields on
VehicleInput. - Let players change them at runtime with the Input System’s rebinding API (
PerformInteractiveRebinding) and save them withSaveBindingOverridesAsJson.
Camera (Cinemachine 2 and 3)
AttachCamera makes a Cinemachine camera follow the player’s vehicle and zoom out with speed (Min Max Zoom is the orthographic size at rest and at top speed). It works with both Cinemachine versions:
- Cinemachine 2.x: assign a
CinemachineVirtualCamera. - Cinemachine 3.x: assign a
CinemachineCamera. The demo scene was made with Cinemachine 2. It keeps working under Cinemachine 3 as it is, and also after you run Cinemachine’s upgrader: the camera reference is kept, so there’s nothing to reassign.
Without Cinemachine, AttachCamera does nothing and logs a warning; use your own camera script instead.
Components
Core
VehicleController
Controls all the sub-components of the vehicle. It holds references to different components of the vehicle as per the requirement. It’s the boss of all the smaller parts in the car. It knows about all the different pieces and how they work together to make the car run smoothly.
Vehicle Motor
Uses Unity’s built-in physics engine to control how the car moves by applying forces to its 2D rigid body and joints.
Vehicle Effects
Plays the different particles according to the events.
Vehicle Health
Controls the vehicle’s collision events and changes its health accordingly.
Vehicle Stunts
Using the rotation and position of the vehicle triggers various events like Wheelie, Flips, Stopies, etc. Flip Angle in the vehicle data sets how far the vehicle must rotate for a flip (default 340°).
Vehicle Fuel
Takes note of current vehicle fuel.
Vehicle Sounds
Plays the different sounds according to the events.
Vehicle Lights
Headlights that are on while the vehicle is driven, and a glow while nitro boosts. Assign URP 2D lights (Light2D, needs the Universal Render Pipeline with the 2D Renderer); they fade between off and the intensity set on each light, over Fade Time from the vehicle data. Without URP, any objects you assign are simply switched on and off.
Vehicle Driver
The driver’s ragdoll. It falls off the vehicle when the vehicle is wrecked.
Vehicle Editor Tools
Updates the position of Wheel Joints and different particle systems based on the wheel location.
Scene
Vehicle Input
Reads the keyboard, gamepad, tilt and on-screen buttons, and drives a vehicle. Leave Vehicle empty to drive the vehicle marked Is Player, or assign one.
Vehicle UI
Health, fuel and speed meters, plus a log of stunts and crashes.
Attach Camera
Makes the Cinemachine camera follow the player vehicle (see Camera).
Vehicle Switch
The demo’s vehicle picker. It enters the selected vehicle and parks the previous one.
Scripting
Stunt and crash events
Each VehicleController raises typed events, so your UI or scoring can react without parsing text:
vehicle.OnStunt += (StuntType type, int value, bool perfect) =>
{
    // type: Wheelie, FrontFlip, BackFlip, Stopie, AirTime or Landed
    // value: the flip count, or the stunt's duration in seconds
    // perfect: the vehicle never flipped over during the stunt
};
vehicle.OnDeath += (DeathReason reason) => { /* Damaged, Stuck or OutOfFuel */ };
To wreck a vehicle from your own code, call vehicle.Die(DeathReason.Damaged). RepairVehicle() and ReFuelVehicle() repair and refuel it.
AI drivers
Any script that implements IVehicleInput can drive a vehicle. Drag it into the vehicle’s Input Source field, or set vehicle.InputSource from code:
public class SimpleAI : MonoBehaviour, IVehicleInput
{
    public float Movement => 1f;      // -1 brake and reverse, 1 accelerate
    public float Lean => 0f;          // -1 lean back, 1 lean forward (bikes)
    public bool HandBrake => false;
    public bool Boost => false;       // starts nitro while true
}
More than one player
For local split-screen, give each player their own VehicleInput, AttachCamera and VehicleUI, and assign that player’s vehicle in each one’s Vehicle field. Assign different Input Actions to each player’s VehicleInput (see Rebinding), and turn off Use On Screen Buttons for players who don’t use the touch buttons.
Sounds
VehicleSounds.PlaySound takes a VehicleSound (Boost, Brake, Start, Hit, Blast) and plays the matching clip from the vehicle data.
Vehicle Setup Wizard
The quickest way to make a new vehicle is Tools > Cubehole > Vehicle Setup Wizard. It builds a working prefab, with joints, ground and flip checks, center of mass, particles, sounds, the driver and its own data asset, in five steps. Every step starts with working defaults, so Skip to Create is there as soon as you have sprites.
1. Vehicle: pick the Dirt Bike, Jeep or Sports Car to start from. No art yet? Pick a basic shape instead: Hatchback, Pickup, Buggy, Monster Truck, Dirt Bike or Scooter. Each comes with plain sprites and its own handling preset, so you can prototype right away and swap in your art later. Or copy any vehicle in the project, including the demo ones and vehicles you made with the wizard: it loads their handling, components and layout, and their art too.
The basic shapes are in Starter/Shapes (bodies, wheels, a fork and a swingarm, light grey so you can tint them with a Sprite Renderer’s color) and their handling presets in Starter/Data. The presets also show up in the wizard’s Load Handling From list, and you can drop any of the shapes into the wizard like your own sprites. Each one also comes with its driver seated to fit: the car drivers sit behind the body and show through the see-through windows, and the bike riders hold the handlebar and stand on the foot rest or deck. If you draw your own car, leave its windows see-through (transparent or partly transparent pixels) to get the same look; the wizard keeps the body’s collider solid behind them.
2. Sprites: drop a body sprite and a wheel sprite, or use the starting vehicle’s own art. For bikes, you can also add a fork and a swingarm sprite (see Bike Suspension below).
3. Wheels: drag the wheels, center of mass, driver seat, fork top and swingarm pivot in the preview, or type values. Car wheels are centered in the body sprite’s wheel arches automatically.
4. Features: handling, which components to include, controls and layers.
5. Create: saves the prefab and its data asset in their own folder and adds the vehicle to the open scene. In a scene with a Vehicle Switch, like the demo, the vehicle is added to its list so you can drive it right away.
Bike Suspension
The demo bike’s fork and swingarm move with the wheels. They are separate sprites driven by two small components:
Fork: an object with CopyTransform follows the front wheel’s position (not its rotation). Its child has RotateTowards aimed at a point on the body at the steering head, so the fork stays on the axle and always points at the head. The fork draws behind the body, so its top slides in and out of sight like a real telescopic fork.
Swingarm: an object at the swingarm’s pivot on the frame has RotateTowards aimed at the back wheel, so the arm swings as the wheel moves on its suspension.
The wizard builds this for you: add a Fork sprite (drawn upright, axle at the bottom) and a Swingarm sprite (drawn level, axle end on the left) in the Sprites step, then drag the orange Fork Top and Swingarm Pivot points in the preview. In the Wheels step, set Fork Axle and Swingarm Axle to where the axle hole is on each sprite, so it sits on the wheel’s hub, and Fork Size and Swingarm Size to fit them to the bike. Hide Above Fork Top and Hide Past Pivot (both on by default) add Sprite Masks, so the top of the fork disappears into the frame however far the suspension pushes it up, and a long swingarm doesn’t poke out in front of its pivot. The demo bike hides its fork the same way. Leave them empty if the fork and swingarm are part of your body sprite. To build it by hand, copy the FrontWheelFollow object and the swingarm under Graphic from the Bike prefab, then set their targets to your wheels.
Driver
The driver is a ragdoll: limb sprites on bones linked by HingeJoint2Ds, with a VehicleDriver on its root. While the vehicle is driven, the driver holds on to it. A car’s driver holds on by its body and sits still; a bike’s rider holds on by its body, hand and foot, with loose limbs. When the vehicle is wrecked (crash damage, or getting stuck upside down), VehicleDriver.Detach lets go, so the driver tumbles off. Running out of fuel only stops the vehicle.
In the wizard: turn on Driver Ragdoll in the Features step, then use the Driver section of the Wheels step:
Driver: the vehicle’s own driver, or any other driver prefab in your project. A different driver takes on the riding pose of the vehicle you start from: a bike rider in a Jeep sits still like the Jeep’s driver.
Driver Seat and Driver Size: where it sits and how big it is. Drag the purple ring in the preview to move it.
Driver In Front Of Body: draws the driver over your body sprite. Turn it off for a car with see-through windows, so the driver shows through them.
Pose: Body Lean and Head Tilt turn the body and head. Turn on Hands On The Vehicle and drag the cyan Hand Grip ring onto the handlebar or steering wheel: the arm bends to reach it, and a hinge holds the hand there. Feet On The Vehicle does the same for the foot with the Foot Rest square. The hand and foot let go with the rest of the driver when the vehicle is wrecked. With hands or feet off, Upper Arm, Forearm, Thigh and Shin turn each limb by hand. The wizard warns you when a grip is out of reach. Reset Pose goes back to the driver’s own pose.
Your own driver: duplicate Prefabs/Drivers/Driver.prefab (or the BikeDriver variant), replace the limb sprites, and keep the bone names (BodyBone, HeadBone, ArmFBone, HandFBone, LegBoneF), so the wizard can give it the right riding pose. Then pick it in the Driver list, or drop it on Or Drop A Driver.
New Vehicle Creation
To set up a vehicle by hand instead of with the wizard:
Step 1: Duplicate any vehicle prefab game object.
Step 2: Replace the sprites and adjust the scale and position of different parts of the vehicle.
Step 3: Do step 2 for all the vehicle parts.
Step 4: In the parent and wheel game object adjust the box collider size and offset according to the new sprite.
Step 5: Adjust the position of different particle systems according to the new sprites.
Step 6: Adjust the position of the Flip Check transforms.
Step 7: In the parent object set the value of Suspension offset according to your need. Greater value means looser suspension.
For vehicles with different wheel sizes, follow Steps 8 and 9.
Step 8: Remove the Vehicle Editor Tools component from the parent.
Step 9: Adjust the Wheel Checks transform positions.
Step 10: Create a new vehicle data scriptable object. Assets/Create/GameData/VehicleData.
Step 11: Tweak the values according to the vehicle type.
Step 12: Optional: add URP 2D lights as children of the vehicle, and assign them to a VehicleLights component and to the Lights field of the VehicleController.
Step 13: Play and check if everything is working as expected.
Step 14: Repeat steps 11-13 until you are satisfied with the result.
Support
While we tried to involve most stuff in the documentation, though, in case you have any further trouble, be sure to get in touch, and I will assist with the issue.
If you liked asset content and quality, be sure to share your feedback on the asset store. Also, be sure to get in touch for any further queries, suggestions, bugs, or feature requests.
Email: [email protected]